Another beautiful Sunday workshop at the Studio – this afternoon, we created Spirit Boxes, small wall sculptures with a hidden compartment on the back. Each one has a special “heart stone” jewel or symbol in the center and lots of other adornments The artisan participants were very original and imaginative. Nobody fought over stuff, everyone got along – gee, you guys, you play well with others! Thanks ♥♥♥
Category Archives: How-to
Discovery: The Blue Stuff
I am passing on to you a tip about something which, until this morning, I had never tried and is pretty amazing – it’s blue (and white) stuff. I ordered it from a place called Cool Tools, which specializes in supplies for metal clay artists. This is a mold-making compound – technically it’s called Mega-Mold Silicone RTV Molding Compound and it uses a process called RTV, which means room temperature vulcanizing. Vulcanizing is a chemical process that converts polymer into durable material. Who knew??
So, you squish the blue part with the white part and push it against something you want to make a mold of. I swear, five minutes later it’s ready to go! Jan Longfellow told me that she has used it to make molds for her silver clay jewelry. it’s pretty amazing – here are some photos – I don’t know quite where I’m going with it, but it is sooooo much fun to play with! You could make a mold of your big toe, or your car key or a favorite brooch – the possibilities are positively goofy!
Friday Freebie – little spring cards
I saw the most amazing redbud tree yesterday on my way to Trinity, and all of the ornamental pears are loaded with white blossoms – spring is definitely coming out all over. Here are some little cards to tie on baskets or bouquets. You can print them out, cut and fold them, and attach them to Something Nice for Someone.
Mac Fonts 101
By special request, here’s the Mac version of my last post:
Finding new fonts to use on your Mac is just as easy as it is with Windows computers, just a little different. Again, I start with Fontspace just because I can usually find something I like there.
I found one that I want called “Celtic.” I clicked on the Download button directly below the font.
My download window opens and I double-click in the folder that has the name of the font.
When the folder opens, I double click on the font itself, the file that ends in .ttf (true type font)
I click on the Install Font button and – voila – the next time I open a word editing program or any other application that uses fonts, it’s there (see below).
Fonts 101
Ever want to add a new font to use in your designs? It’s really easy – here’s how. These directions are for Windows but I can do a Mac version later if you like.
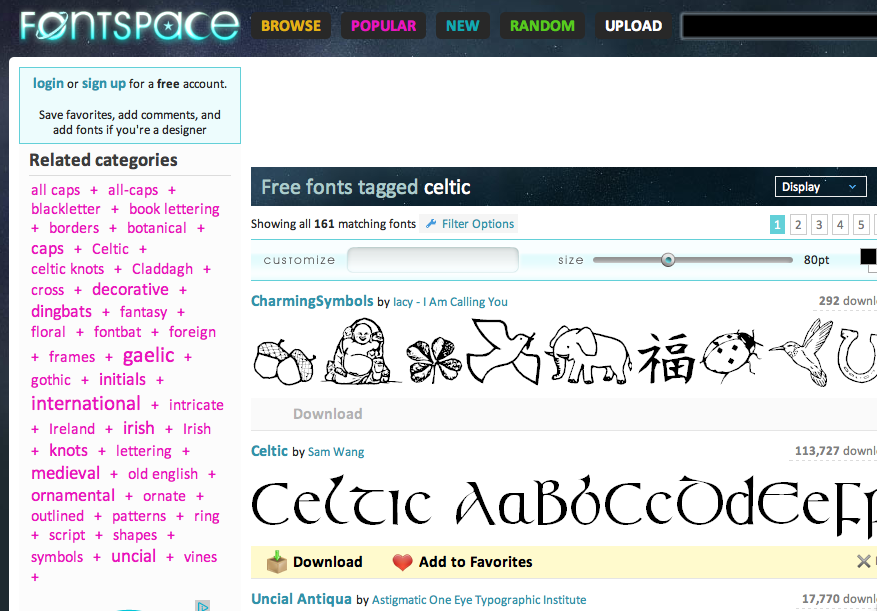
If I’m looking for a new fort for a particular project (or just for fun) I start at Fontspace. Lots of designers contribute to it and you’ll see fonts from beautiful to weird.
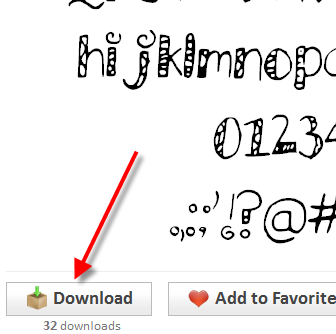
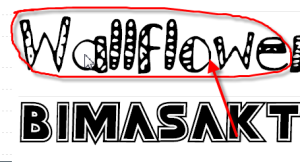
I found one I like called Wallflower.
I clicked on the Download button (be careful here to click the correct arrow because sometimes ads for software slip their download links in and you end up with something you didn’t want – ads are the way fontspace keeps it free)
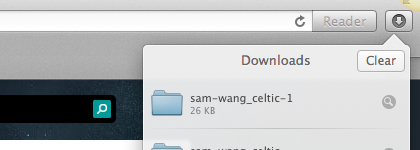
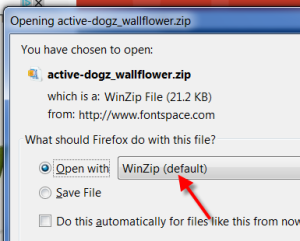
You font will download as a Zipped file:
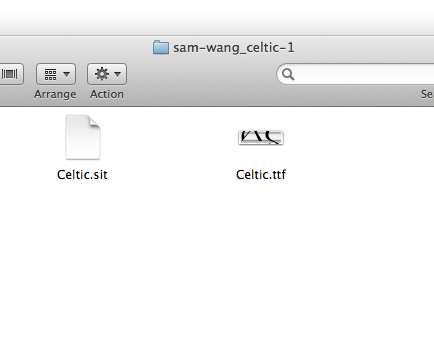
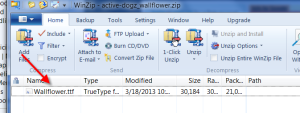
When you see it in the window, double-click on it.
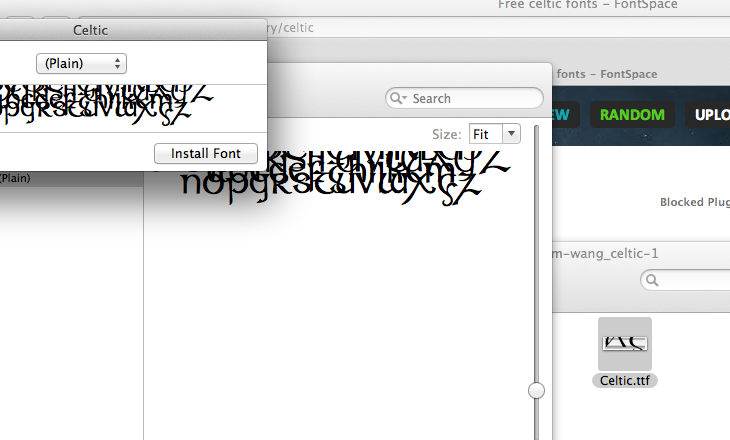
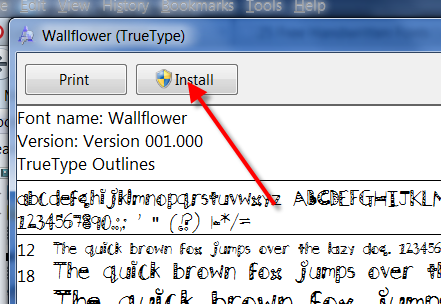
A page will open with every letter and variation of the font – and if you look at the top, there’s an “Install” button.
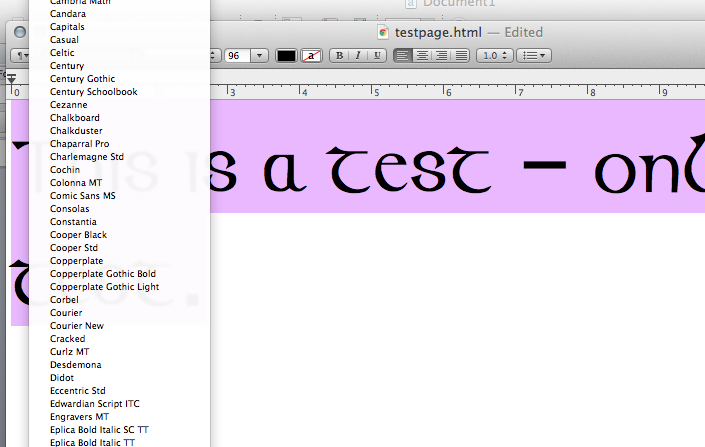
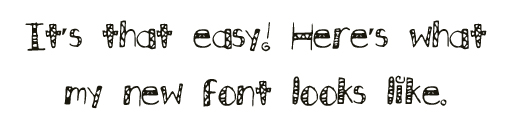
And, voila! The next time you open a word document or a program like Illustrator, it will be available for you to choose from in your font list!
Sunday Wrap-up
Today’s Mala and Spirit Flag Workshop felt like playing – wonder if there’s such a thing as a Playshop? It was like summer outside where we splattered our prayer flags with paint. We didn’t get much more done with the flags because sitting around the table stringing mala beads and talking was a lot more relaxing. One of the things we discussed was creating with intention, which seems to elevate and enrich any project.
Congratulations to Barbara Weitbrecht, the winner of the Mala meditation bracelet. Barbara, email me and let me know if there’s a favorite color you’d like me to use for the tassel. I’m still far from perfect at making these little wrist Malas, but it will be made with much love.
Here’s a video from today’s workshop – you can see what the parking lot around the Studio looks like! It was deserted on a Sunday afternoon so no one ran over our prayer flags. Yay!
Spirits abound
Yesterday’s Spirit Doll workshop at the Studio was magical! We started with sticks and clay and cloth and ended up with enchanted beings! I am going to have an exhibit of Spirit Dolls by these talented creators and those in the March 24 class on Friday, March 29th. Stay tuned for details, but I think you’ll agree that these sculptural forms are much more than the sum of their parts.
Friday Freebie – get in the spring spirit
I’m having my first workshop on Creating Spirit Dolls this Sunday. That one is full, but there is another one on Sunday, March 24th, that has spaces if you’d like to sign up. There is also a very eclectic workshop on Creating Mala Meditation Bracelets and Prayer Flags on March 17th. Celebrate spring and refresh your spirit!
Today’s freebie is a booklet for everyone about Spirit Dolls – I put it together last Sunday when I was working by myself in the Studio making my own Spirit Doll. It was an odd experience – she really seemed to become “real” as I worked with the fabric, twigs and clay. Here’s a link to the booklet. I’d love it if you came to the workshop at the Studio and worked with the group, but you can try it on your own as well with these instructions.
PS – I’ve also done an update on my webpage that,hopefully, will make it easier to find out about events at the Studio.
Bristow at the Studio
Last night I felt as if I had been transported back forty years to my undergraduate art major days at Trinity – there was my Prof, Bill Bristow, teaching us all how to draw at my Studio. He had the class of 16 scribble a ball of twine, and before we knew it, we were drawing horses. But best, perhaps, were his stories about fellow artists and old friends. He also spoke of being profoundly influenced by the great Japanese artist, Hokusai. All of us loved learning from Bill and are looking forward to the next time!
Friday Freebie – another absolutely invaluable free tip
I learned this from a jewelry designer friend – I have a favorite pin that’s shaped like a kimono, and I like to wear it, but it’s kind of large and heavy and it slips around and always seems crooked. My friend showed me how to cut a short length of drinking straw and slip it onto the rod part of the pin. Close the pin clasp around the straw. Then you can slip a thin leather cord or a very thin chain through the straw and turn it into a pendant! Check it out – it’s very simple and very cool.
- A slippery silver pin
- Unwrap a drinking straw
- Cut a piece a bit shorter than the pin
- Thread cord through straw
- Voila!! A pendant that hangs straignt and looks striking!