Easy color-to-sepia photos for beeswax collage using iPiccy

Sunday’s workshop at the Studio is Beeswax Collage (it’s sold out, yay!), and I’m going to ask the participants to bring a sepia-toned photo to work with. I’m sending them the link to this post to show them how to do a sepia effect with iPiccy, and you can find out, too, by following these instructions!

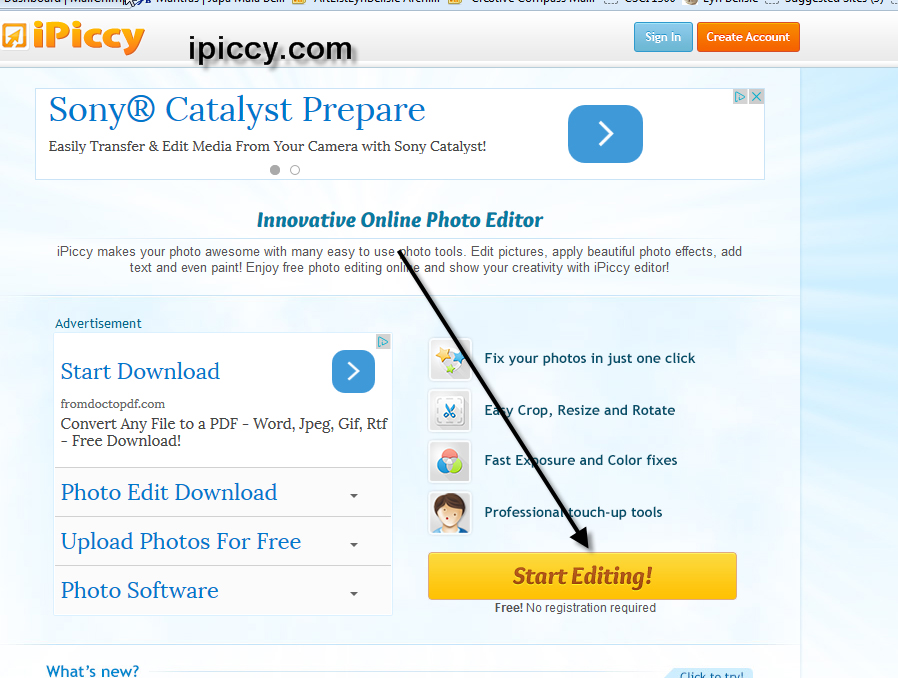
First, you need to choose a photo that you want to transform to sepia, and remember what file it’s in so you can find it to upload it. Then go to iPiccy and choose Start Editing!

sepia

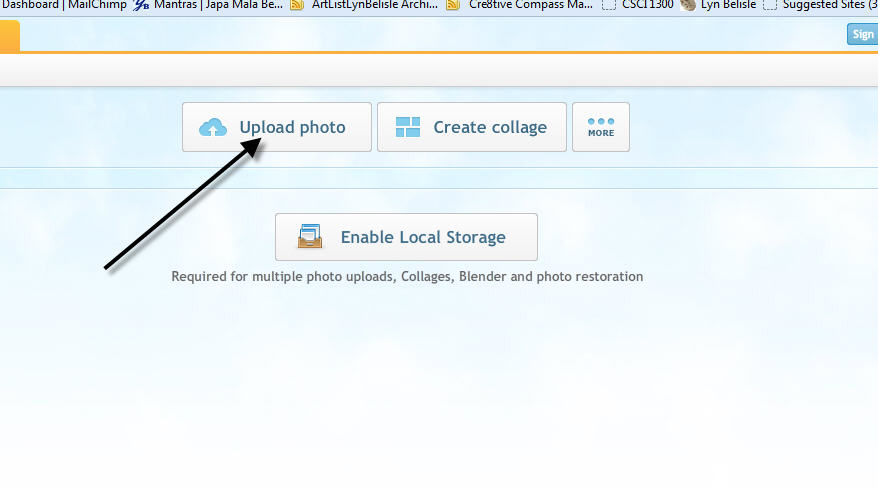
You’ll see a window that asks you to upload a photo.

sepia0 
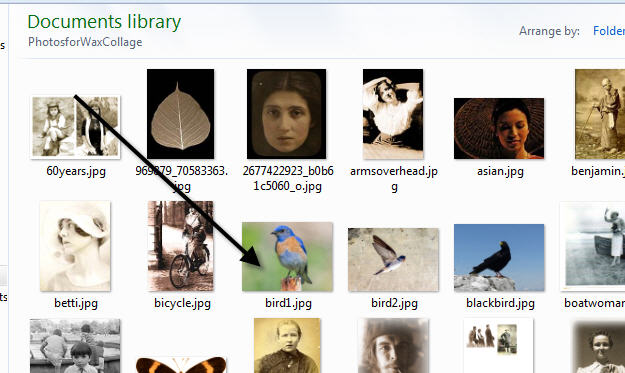
Browse to the file on your own computer that has the photo you want to change from color to sepia and select it

sepbird    Your photo uploads into the editing window.

sepia 5

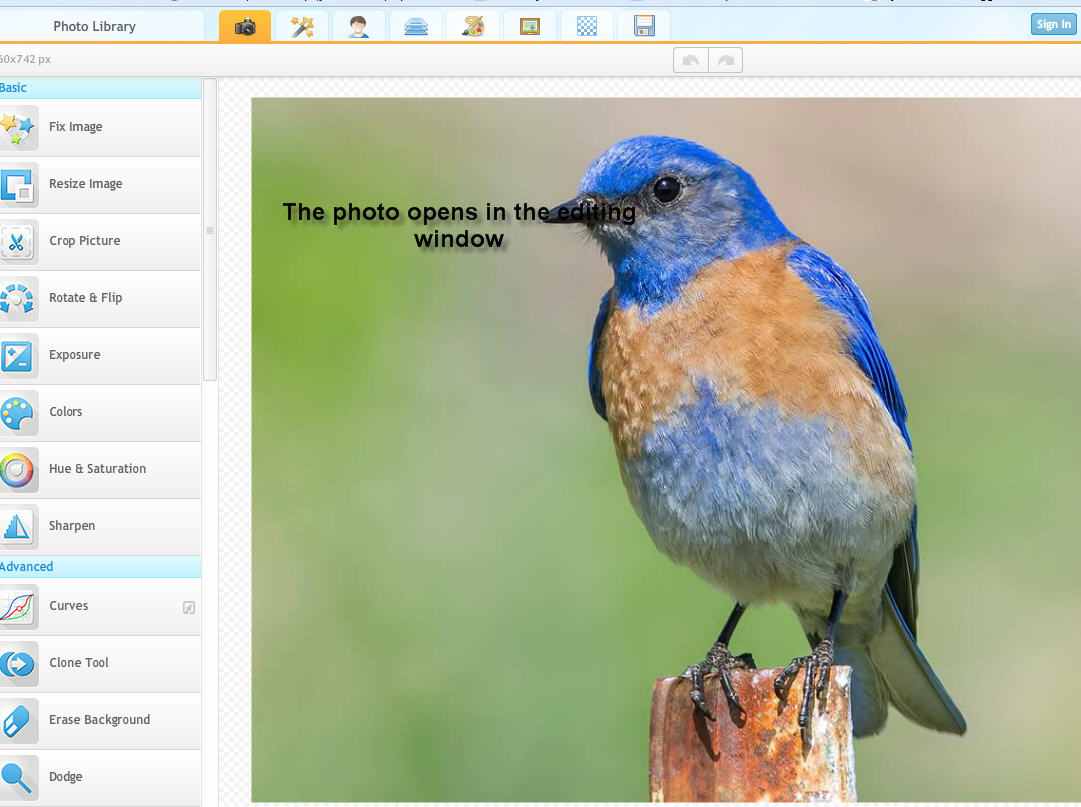
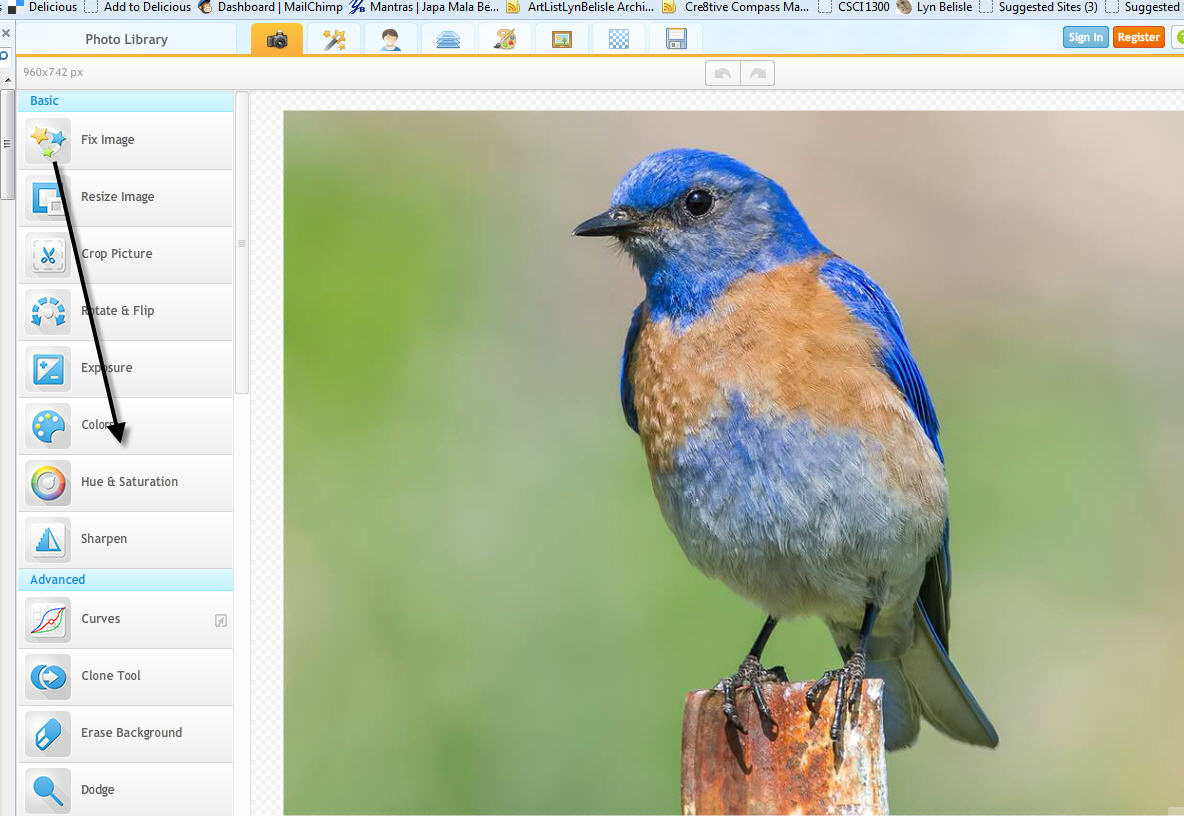
Look on the left side and find the bar that says Colors.

sepia5
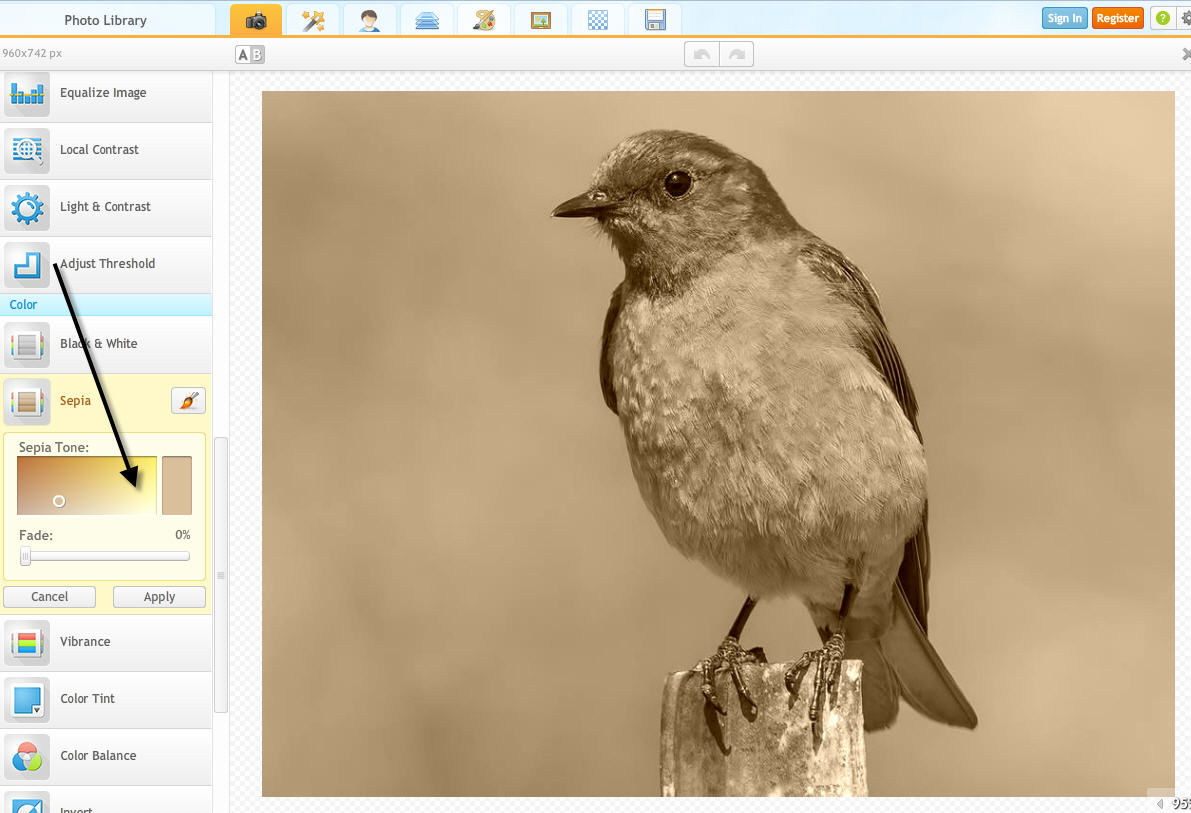
Click on it and scroll down that list until you come to the bar that says Sepia – choose the sepia tone that you like.

sepia3Once you’ve transformed the image to sepia, you can click on the Save icon at the top right and save it back to your computer

sepia7
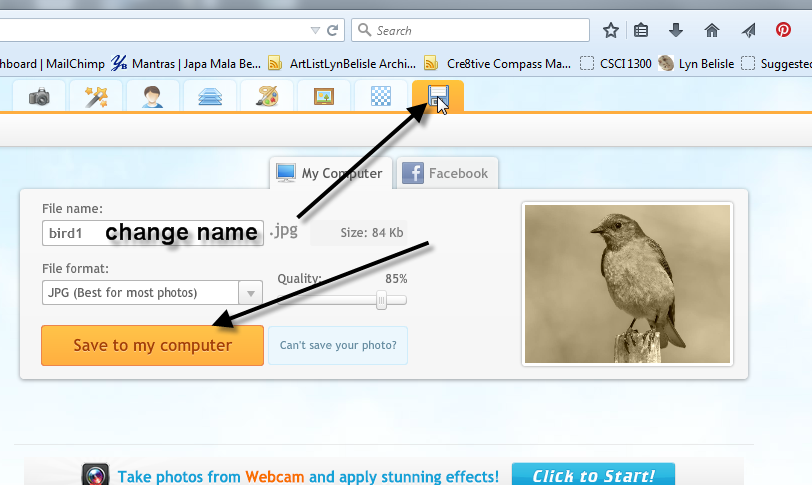
Give it a different name so it doesn’t overwrite our original color photo. Now you are ready to print it out and use it for your beeswax collage – or whatever creative purpose you desire!

Happy weekend, everyone!

How to describe your personal art style using Pinterest as a tool

corwindetail

Lyn Belisle, “Corwin,” Assemblage 2015

“Oh, you’re an artist? What kind of art do you do?” I get that question fairly often, and I usually just say, “Mixed media.” But if you need to think in terms of a fuller description (such as when writing an artist’s statement), you might need to come up with adjectives that are more specific to your personal style.

One way to do this is to  start a Pinterest board with images of the kind of art that resonates strongly with you – chances are, these images will reflect your own aesthetic. For example, here’s a recent selection from my own Pinterest “Stealboard” (as in “Steal Like an Artist”):

pinterestone

From this small selection, I can see that I gravitate toward a neutral palette of grays and rusts. I like organic shapes, twig-like lines, and odd and mysterious iconic faces.Not surprisingly, these elements show up consistently in my own work.

Now compare my favorite images to the Pinterest board of North Carolina artist Eileen Ross:

pinterestthree

I don’t know Eileen, but from her selections, I’d say she likes elliptical shapes, whimsical impressionist content, deep pastel colors, washes of paint, and calligraphic elements. When you look at her own work, you can see the strong relationship between what she likes and what she creates. Interesting!

What if you don’t have a Pinterest favorite art board, or even a Pinterest account? It’s easy and free to set one up. Just go to Pinterest and follow the simple directions. I would also suggest that you install the Pinterest browser button – here’s how. This little tool allows you to click on your browser’s tool bar to add a picture from the Internet to your Pinterest favorites board instantly. Be warned, though – once you start collecting, pinning, and analyzing the kind of art work that you love, you can get addicted!

Goodbyes, hellos, and how to start a blog

The Medina Mud Band in the early days

The Medina Mud Band in the early days

The Medina Mud Band said goodbye to the Quihi Dance Hall Saturday night, and to the many benefit gigs we’ve played there for Inner City Development. So many friends turned out despite the stormy weather – and the biggest surprise came from Patti and Rod Radle, Inner City’s founders and executive directors, who announced that they had established the Medina Mud Band Cultural Arts Fund for the children at their West Side community center. So the band lives on in a fine legacy – what an honor!

Cousins Pegeen, Jesse, (me), Grace, and Skip

Cousins Pegeen, Jesse, (me), Grace, and Skip

One of the coolest things about the event was meeting my cousins from Louisiana, who drove to Texas for the gig. My cousin Skip has been here before, but I got to meet his daughter and her children in person! We had the best time. The girls wanted to go to the Wax Museum on Alamo Plaza. I have to say that it is one of the weirdest places I’ve ever visited. Many of the life-sized statues were creepily real, while others looked kind of goofy. Here’s a gen-yoo-wine photo of me and Barack Obama – which is wax and which is real??

obama

President Barack Obama gives a high five to Lyn Belisle just before he melts into a puddle of wax

OK, now I’ll bet you are saying, “Gee, I wish I knew how to make a blog so I could put up pictures of touristy wax figures on the Internet.” Help is here – actually, I just remembered that I made some tutorials for my Trinity students on how to make a blog using Blogger. It’s free (all you need is a Google account), and it’s fun. These tutorials should be fairly easy to follow if you want to try it – nobody says you have to keep it.

The only thing you’ll have to remember is that in the first video, I tell the students how to access Blogger through their university account. You’ll just go directly to blogger.com and take it from there. There are also lots of helpful videos on You Tube as well, and a good help menu on the Blogger site. On your mark, get set – BLOG!

Tutotials:

It’s the Shish-ka-barbies – – run away!

What happens when I’m back home in the little studio on a cold, rainy day and I’m procrastinating about a jillion things, including making my New Year’s resolutions? I channel my inner Craft-Mama-Goddess and make Shish-ka-Barbie dolls instead!

howdy

And I can hear you out there, saying, “Oh, Lyn – how can *I* make a Shish-ka-barbie of my own?” Never fear – one of my goals for the next year is to make more free tutorials, even if they do have a slightly Goofy Factor like this one. So here ya go –

But wait, there’s more – I’ll be giving away these guys as the first Friday Freebie of 2015, so stay tuned. Bye for now – hope you’re looking forward to a very Happy New Year!


Know when to fold ’em –

tagPresenting, for your Labor Day holiday folding pleasure, a simple but impressive little origami project. You can make a stack of these pocket-note-tags to use on gifts or even as place cards. You can even drink out of them, as you will see. This Emmy winning (not) short video was produced in my dining room. Awards go to Max the Cat for Best Immovable Object and Chico the Cat for Best Wardrobe Malfunction.


Juried art shows – and how to make a crane (the bird kind)

Good news yesterday – one of my pieces was accepted for the International Encaustic Artists “Poetry Bleeds Rust” exhibit in at the NAWA Gallery in New York. Boy, am I surprised, first of all, because encaustic is a stretch for me, and secondly, the piece that was selected was not the one I expected to be, if any were. Here are the three pieces – which one do you think juror Jenn Dierdorf choose?

She chose the third piece, Rune and Relic – that’s the one I had to re-do because the first version didn’t fit the size retirement. I liked the one called Campfire Poems better, but there ya have it. If you decide enter a juried show, remember these things (I try to):

1. If you are rejected, don’t take it personally – put yourself in the juror’s place – it’s a tough job and opinions about art are extremely subjective and subject to one’s own taste. After all, you don’t like every piece you see in a gallery or museum, maybe not *any* of them.

2. If you are accepted, be grateful! But don’t start making every piece of art you do from then on just like the accepted piece – be true to yourself and continue on your own intuitive path, even if it veers off in another direction. Don’t let acceptance of one piece by a juror determine your limits.

3. Keep entering shows even if you don’t get in – it gives you a free critique, a new perspective, and a sense of professionalism. Both of my entries in this year’s San Antonio Art League show were rejected, but I figure they didn’t resonate with the juror. I liked them though, and I’ll keep working and submitting. So there! Neener neener 🙂

And now, for your weekend folding pleasure, here’s one from the vault, a video tutorial I did for a friend two years ago before I had the big Studio. It’s a five-minute origami crane – can you do it in five minutes? Ready – GO! And have a great weekend.

Cheesy video, great afternoon!

Darn it! If only I had remembered to take my video camera to yesterday’s Show and Tell at the Studio – it was the best ever. But I did make a little sampler of some of the presenters with my iPhone – unfortunately, you will have to put up with the “black bands” on the sides and the goofy volume. But it was a blast (see first segment). Thanks to everyone who came, and especially to the diversely talented show-and-tellers – we’ll do it again next month (probably Saturday, Aug. 23rd).

Workshop wowsers with household cleaner

That Citra-Solv stuff just keeps on giving – it cleans up cat barf (personal experience), it’s organic and smells good, and it goofs up old magazine pages and turns them into art paper. I learned about it when artists Bonnie Davis and Rosemary Uchniat demo’d it at the first Studio Show and Tell (the next one is this Saturday, 2-4, so be there). Two workshops later, we’re having a great time combining Citra-solved paper with impeccable composition and inspired vision and turning it into lovely small artwork. Here’s a short video from yesterday’s collage workshop – look what these guys did!

If the altered paper process intrigues you, here’s a great tutorial from good old Cheap Joe featuring Cathy Taylor, who really specializes in collage with Citra-solv papers. It’s a lot of fun to play around with.

Gilding the wax paper – or whatever

And now, for your mid-week creative pleasure, here’s a short tutorial about how to manage that pesky gold leaf. What you apply the stuff to is entirely your business 🙂

Feel free to share!

All right, students – get out a piece of paper . . .

What? Bored with summer vacation already?? Here’s a little midweek tutorial that could come in handy in all kinds of situations. You could even use this for a sun hat if you make it big enough and turn it upside down. If you can’t follow the *very easy* directions and need an in-person demonstration, come to the Show and Tell at the Studio this Saturday and I’ll give you a step-by-step help session. 🙂 Plus, you’ll get to meet Pablo Solomon, our visiting artist – hey, he’s a sculptor – wonder if he can do this . . .