A free workshop on Teachable – Spread the Word

The events of the past two weeks have been unsettling and rocky, and perhaps that is necessary in order to prioritize some important discussions that are long overdue. I can’t presume to speak with any sense of understanding, but I can listen and encourage the discussion through art. You can, too. Read on to see how you can sign up for a free workshop.

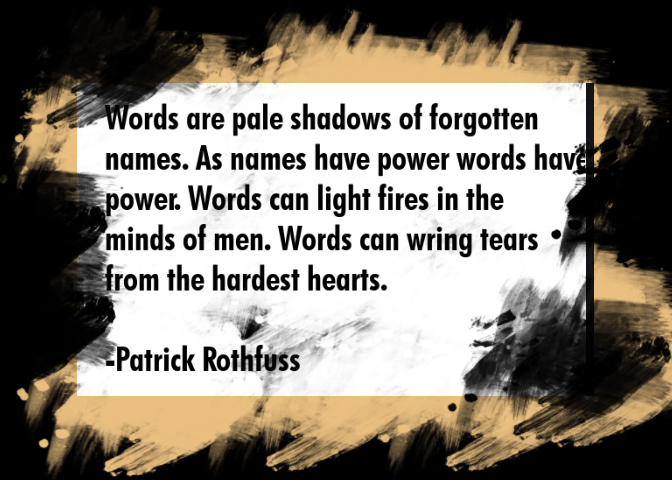
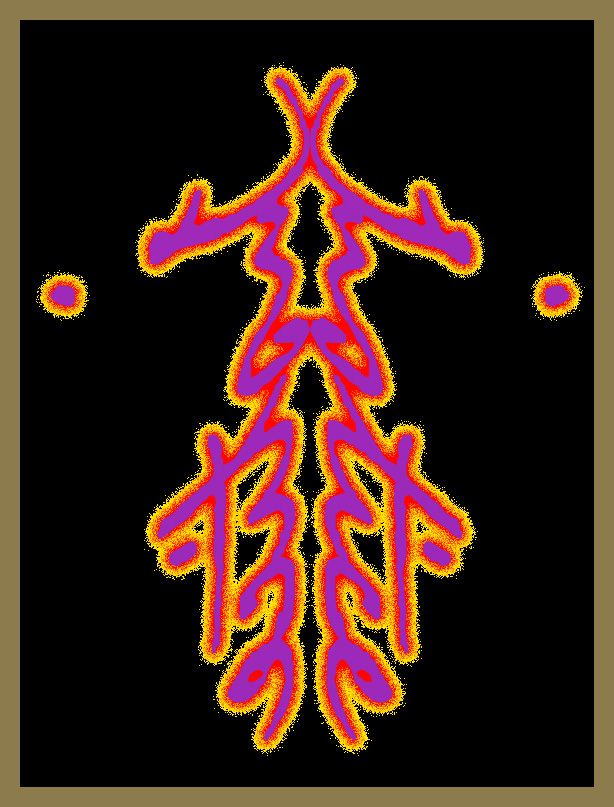
It occurred to me that WORDS are potent agents of change in difficult times.

And that reminded me of a project I did a long time ago with my high school art students which elevated meaningful words to artwork. It involved choosing a “mantra” word as the basis for a symbolic collage.  This can encourage a lot of good discussions about personal values. Here’s a digital example of that project using the word “Justice.”

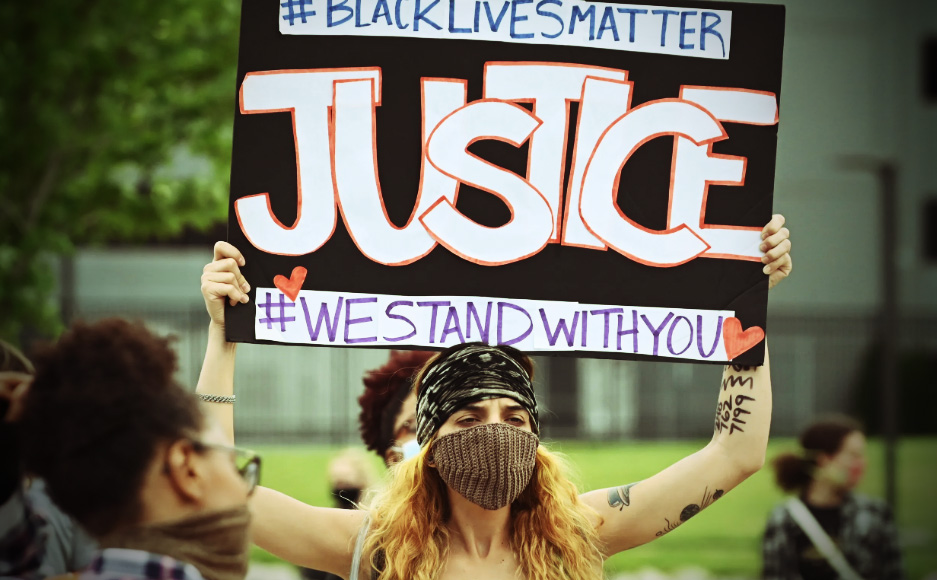
We’ve seen a lot of that word lately:

One thing I CAN do to participate in the discussion is teach about how we can communicate with artso over the past week, I’ve created an absolutely free workshop on Teachable called “Spread The Word.”  The idea, based on my lesson with students, is to choose a word that has meaning and making it into art to share.

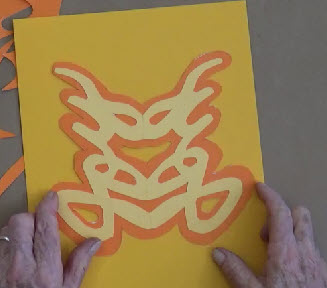
I worked this project myself before I started filming the lessons on how to do it. I chose the word “breathe.” Breath is life and must be honored and protected. Here is my finished artwork:

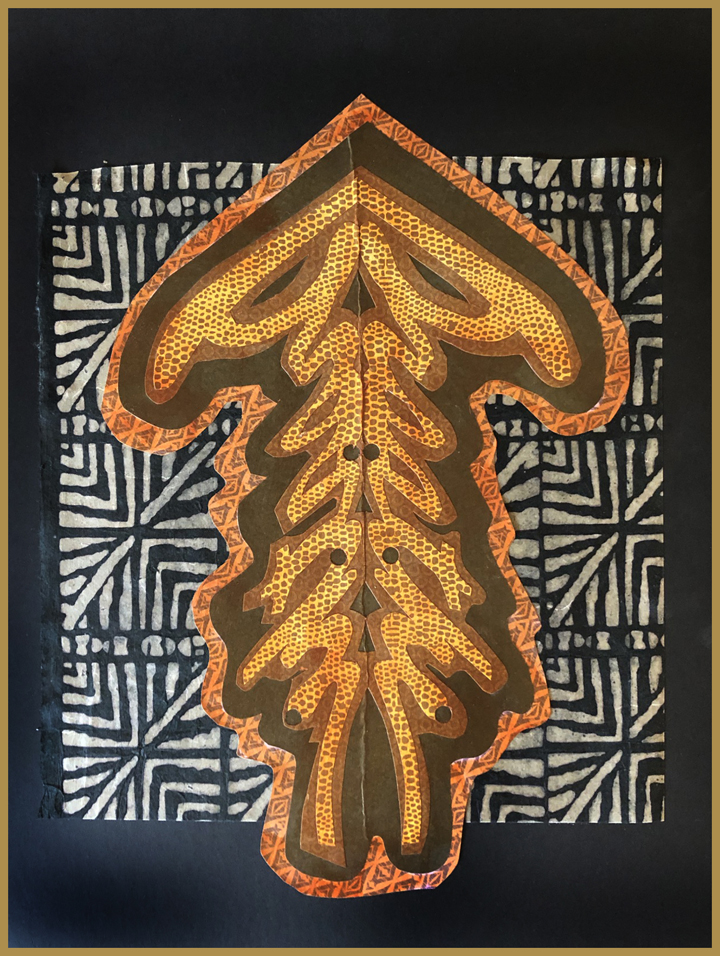
This piece is made from several kinds of cut paper. It’s 11 x 14″ and putting it together was really an easy process. You can do this with almost any word. How about using the word “Dad” for a Father’s Day art collage?

This workshop, as I said, is absolutely free. You can take it just for the experience without any agenda at all.

It’s an engaging and easy technique that everyone loves. You can make a word collage of your own name or a friend’s name. You may, like I did, choose a word that helps you reflect on how we treat each other in this incredibly difficult time – a word like “unity” or “love.” Whatever you like. No experience or special materials required.

If you want some inspiration, here is a good post on words about social justice on the site Astronomy in Color. Some of them I hadn’t hard of, but I know about them now.

The free workshop, Spread The Word, opens today on my Teachable site and will be up until the 4th of July. You just need to sign up at the link below.

SPREAD THE WORD

If you’d like to share the word art that you create, I’d love to post it on my website in the Spread The Word Gallery page. Just email me a photo of your work before July 4th.

Spread the word. We’re all in this together.


Postcards to Myself – take a second look at a mess

So my next big project is called “Postcard to Myself” and it’s an expansion of a workshop I taught several years ago, this time in eBook form with eight or ten fun instructional videos embedded in the pages.

The idea is that we all have artwork that we make along our journey as artists, and every time we create, we learn something worth remembering. Not everything is worth saving and storing as a finished piece, obviously, but experiments can be saved in postcard size 5×7″ format with notes on the back about the process – what worked, what didn’t, and what were the profound surprises. These are the “postcards to myself.”

It’s kind of a different way to art journal, I guess. Every piece is an inspiration and a reminder of where we’ve been and what we’d like to remember. I should be finished with the eBook and videos by the end of June and will be asking some of you for reviews before it goes up for sale (cheap) on my website.

Anyway, part of the process besides writing the book is the experimenting and note taking. Yesterday, I was playing with an ink-jet transfer technique using matte medium. Here’s the image I found on Flickr Commons that I wanted to use.

I got the “bright” idea to undercoat the surface with white tempera paint before I did the acrylic medium transfer.

Well, duh. The tempera paint just kind of glopped into the gel and it was a big mess when I tried to peel of the transfer image.

Oh, well — there was a big fat failure. Until . . . .as the gloppy paper dried, the figure with its veil of tempera started to emerge a bit. I smoothed it out and gave it another look.

What if I cropped it and enhanced it just a bit with a wash of Quinacridone Azo Gold acrylic (aka “Secret Sauce“)?

This is the result – not a masterpiece by any means, but a 5×7 “postcard to myself” about an accidental process that has possibilities. I took notes to remind myself how this happened to attach to the back of the work.

Here’s the piece in a mat. I always encourage you to view your work this way when you can in order to isolate it, elevate its status, and give yourself a new perspective on possibilities.

So that’s an example of how a “postcard” might be useful when you’re working out of your comfort zone. And if it doesn’t work, you don’t have to let anybody know – although you can still make a note.

I’m going to end this post with a video about image transfer that I did back in the Old Studio days. The process uses matte medium and actually seems to be successful most of the time – here it is:

Video Link

Stay safe, stay in touch!


Shards and Tesserae

Christa Lamb is a mosaic artist from Cottonwood HeightsUtah, who has ordered small shard faces from my Etsy shop several times. She sent me a message last week saying, “I thought you might be interested in seeing how I use your beautiful faces in my work,” and she attached some photos.

 I was amazed at her work. I often wonder how artists use these faces, but never expected to see them incorporated into such fantastic mosaics!

I asked her if I could share them with SHARDS readers, and she agreed – thanks, Christa!

She sent several more examples, all of which use mixed media materials to create rich panoramas in tiles, glass and found objects. I love these fabulous “storyboards.”

Here are some more of Christa’s mosaics:

The details are endlessly intriguing.

Look at this mysterious mixture, below!

I found more of her work on Flickr – along with some gorgeous photos of Utah.
Thanks, Christa – so grateful for your work and your email ! Do you show your work in a gallery? We’d love to see more!
Keep in touch,
Lyn


Table for Six at my studio – come join us!

Once a month or so, I’m starting to offer small mixed-media workshops at my Olmos Park studio. They are held on Wednesday afternoons from 1-4. I call this informal series “Table for Six.”

There is a limit of six participants and registration is on a first-come, first-serve basis. You’re invited to sign up – you’ll learn something new and take home something interesting!

Here’s the upcoming lineup. Click on a title to read more and register.

LAYERED STORIES: ENCAUSTIC COLLAGE
(three spaces left at post time)
Wednesday, October 30th, 2019
1-4 pm

ABSTRACT ACRYLIC PAINTING
(four spaces left at post time)
Wednesday, November 20th, 2019
1-4 pm

MIXED-MEDIA VOTIVE COLLAGE CARDS
(six spaces left at post time)
Wednesday, December 18, 2019
1-4 pm

All Table for Six workshops are $65 including materials, and, as mentioned, are held on Wednesday afternoons at my studio @ 515-5 E. Olmos Drive. As anyone who has been there can tell you, it’s a cozy, stress-free zone.

but wait, there’s more . . .

If you’d like a great intro to clay, Leslie Newton and I are teaching a ceramic  workshop called Spirit Animals at the San Antonio Art League on Saturday, October 26th and Saturday, OcNovember 2nd. Click on the image below for more about THAT one – it’ll be fun.  And who knows what will be revealed as YOUR Spirit Animal!

Workshops are about the power and comfort of the creative community, about making new personal statements and affirming individuality in a sharing, caring environment. Join in!


TRY IT! 7-Day Found Object Challenge for Composition Competence

Say THAT three times fast – anyway, this is fun! And it takes practically no time at all each day. It will sharpen your observation skills and boost your composition fluency.

HOW THIS STARTED (you probably do the same sort of thing):

So, I take walks every morning and most afternoons and often find a small object along the way  – like a rock or dried leaf –  that intrigues me. Sometime I put it in my pocket, sometimes I just look at it and leave it.

Last week, I challenged myself to choose one found object a day, bring it home, and see how the daily objects might fit together at the end of the week.

There’s a table inside my front door where I often drop stuff, and here was where I put the first object. (You’ll need a designated spot, too, for your daily objects.)

Monday’s object was a piece of thick layered cardboard, which I first thought was a little book. I found it in the street by my sidewalk and it had been run over a few times and flattened nicely.

Monday – flattened cardboard fragment

Tuesday’s object was a dried leaf that had the most gorgeous rust-patina colors and was curved like an umbrella.

Tuesday – interesting dried leaf

On Wednesday, I thought I had found a bird’s egg by the driveway of a neighbor’s house, but it turned out to be a seed pod of some kind. I brought it home to add to the collection.

Thursday’s find was a slightly grubby bird feather, which is always a nice touch.

Thursday – bird feather, probably a dove?

On Friday, I brought home another seed pod thingy – this one look kind of like a bird.

Seed pod, probably Magnolia

Saturday’s and Sunday’s finds were rather similar for no particular reason – a rolled leaf, and a stick with no bark on either end.

Then came Sunday, which was Composition Practice Day – I  started arranging the seven objects in different configurations on a black piece of paper, then photographing the experimental arrangements with my phone camera.

Important point – there is more than one right answer! This is the great fun of solving art problems versus math problems!

This one may have been my favorite, but that could change depending on how the composition was going to be used:

I also tried the objects on a white background.

It’s instructive to note what works for you balance? Scale? Horizontal versus vertical? symmetrical versus asymmetrical? Stacked versus separate?

You can save your favorite photographs and use them as inspiration for paintings (you already know that the composition works!) or as backgrounds for digital art – here’s one example that I did from the photo on the right, above.

I would love to see examples from all of you who want to play with this idea.

You don’t have to wait until a Monday to start! You just need to choose one object a day without thinking about how it will go with anything else. Choose it just because you like it. When you start your arrangements, document them with photos, and send your favorites to me.

Go to my website (CLICK BELOW) to submit photos of your own 7-Day Found Object Challenge for Composition Competence. I’ll put together an online gallery on September 1st.

FOUND OBJECTS CHALLENGE LINK

I can’t wait to see what you find!


Wax and Clay Talisman mini-workshop

Last week my friend, fiber artist Mary Ann Johnson, arranged a workshop for a small group of four, including her sister Rosalie who was visiting from out of town. The other two participants were artists whose work I have long admired – so it was a very creative afternoon!

This is a workshop that I’ve taught before, but always love, because of the variety of techniques. We worked with clay, paper, wax and fiber to make personal talismans. One of the most amazing parts of the process is rolling paper into beads, then (optionally) adding fiber for texture before painting them with beeswax.

Jean Dahlgren, one of the participants, brought some of her fabric beads (top right in the photo above), and they also took the beeswax beautifully.

One of the nice things about these beads is that you can write a secret message along the inside of the paper before tightly rolling the strip. Rosalie chose to make her beads very simple, without fiber embellishment, so she can see the structure better.

When we started working on the clay faces, some of us chose to add only walnut ink to emphasize the contours, and others added beeswax and metallic finished – bling. The formula for a raku-like effect is a bottom coat of silver, another of blue metallic, then red metallic, then gold metallic to blend all of the layers together randomly.

The handmade beads were strung on strands of Sari silk and sinew.

As an added attraction, we made simple paper origami boxes to hold our beads and our clay faces.

Besides making wax and paper beads for their talismans, workshoppers brought meaningful objects to tie into the silk and sinew strands. Rosalie added charms symbolizing each of her children and family members.

See how her Family Blessing Talisman turned out, filled with magic!

Speaking of blessings, there’s nothing more wonderful than creating meaningful work with a group of like-minded friends. Thanks, Mary Ann, for requesting this workshop!

Email me if you’d like to suggest a small-group workshop at my studio, and if you’d like to play with your own clay talisman faces, you know where to find them! Yep, my Etsy shop, Earthshards.

Stay cool and creative!


Unearthed

“Unearthed”- Lyn Belisle – Mixed Media Sculpture – 18″x 8″x 6″- 2019

Much of my new work is influenced by the Archaeological Investigations report which describes the 1979-80 research and discovery of 13 Archaic period human burials removed from a prehistoric cemetery by Olmos Dam. The investigation provided important information on the cultural practices during that period among people who lived almost exactly where I live now.

I call this new sculpture “Unearthed because I deliberately followed a process by which the clay shards that I created were fired in pieces that would be assembled like an unearthed archaeological puzzle – I did not have a plan about how they would go together, but rather worked on instinct. I let the piece “tell” me how it wanted to be built.

Clay shard pieces at the bottom of the kiln

It was harder than I thought. First of all, engineering a stable form from diverse clay pieces was a challenge. I used a combination of wood, plaster gauze (a gift from Shannon Weber) and a product called Platinum Patch in a few places where stability was critical.

Creating in three dimensions means paying as much attention to the sides and back as the front. The back of the piece shows the intricate textures pressed into the clay shard.

Here’s a detail of the texture on the front. I really like the way the plaster gauze looks like aged fabric remains.

I actually created two heads for this piece and ended up using the larger one.

A large head suggests child-like proportions, while this body suggests armor, so the whole piece resembles an ancient child warrior. Again, when I started out, I had no idea what this creature wanted or how to get there, but — trust the process!

You’ll be able to see this guy (and more of my brand new 3-D work) at  St Mary’s University Library in February as part of the exhibition called  “Naturally Inspired: works by Sabra Booth, Lyn Belisle, Jesus Toro Martinez, and Tim McMeans.” 

It’s gonna be a creative new year!

. . .that’s when I knew her name

One of my favorite poets and people, Pamela Ferguson, contacted me recently to see if I’d teach a Wax and Talisman workshop for her small group, and I said “Of course!”. Pamela had taken the Small Worlds workshop last March and I wrote about her work here in an earlier post.

Teaching this talisman workshop is so rewarding – it’s the subject of my latest ebook, and one of the most personal workshops that I offer. So I was excited to be teaching it “live,” especially when I found out that Pamela’s granddaughter Caitlyn would be in the group. It’s fun to see how different generations respond to an art challenge.

Pamela’s group came to the studio yesterday and we had a thoroughly enjoyable afternoon. The workshop has three components:

  • Personalizing the earthenware face piece and painting melted beeswax wax on the surface
  • Making rolled paper “blessing beads” and adding texture, beeswax, and metallic enhancements
  • Tying symbolic ribbons and cord to the focal piece and stringing the beads

Every step has meaning and intention. I asked the students to let their intuition lead them and to see what would happen. I also asked them to name their pieces when we finished.

This is Caitlyn’s piece – she is a senior in high school and very perceptive about herself and others. She adores her grandmother, Pamela.

Her blessing beads are beautiful, and I like the way she has grouped them at the bottom edge of the face. During discussion time, I asked Caitlyn what she had named her talisman. She said the name kept shifting as she got deeper and deeper into the process, but it had ended up as “Venus” – not what she’d expected. We all understood what she meant !

This morning, I got an email from Pamela saying how much they had enjoyed the workshop. Then she told me that Caitlyn had started talking about her talisman as they were driving home. Her words were almost an impromptu poem, which Pamela wrote down.

Read Caitlyn’s poem and look at the talisman she created which inspired it – lovely.

Talisman
by Caitlyn
Venus is her name –
    the two sides of her face
    the two sides of love
 
The light side has golden glow
The ribbons are bright, peachy,
      lots of strands, beads, charms.
 
The other side is dark –
the walnut stain soaked deeply.
The copper tear by her eye was accidental
      but love can cause pain.
That’s when I knew her name –
      the tear, the dark side.
And those ribbons are thin, stringy –
black, gray – sadder somehow.
 
I didn’t mean for her to be Venus
      the goddess of love
but that’s how she came out.

It’s all about trusting the process – letting go of what we expect and letting the intuitive take over. I’m very glad that Caitlyn’s work and poetry expresses this so perfectly – she didn’t mean for her to be Venus, the goddess of love, but that’s how she came out!

But wait, there’s more! Pamela, a published poet, had her own insight about the process. She sent me her poem this morning, as well – it’s titled “Paper Bead,” but it’s about much, much more.

Paper Bead

     by Pamela Ferguson


Cut a strip of paper,

long

narrow

Write a secret word,

a power word

a sacred one –

a promise – a passion –

a vision word.


Glue the strip

almost end to end

side to side.

Coat your word

with protection.


Lay a skewer on the almost end –

roll the strip onto the tiny dowel

until your word is cocooned within –

held by the power of your hands

the dowel

the glue.


Bedeck the roll with ribbon

or string or yarn-

chain or silk or sinew.


Seal in place with that most

basic of adherents –

pure, warm beeswax.

Coat the cocoon.

Seal your word

in the unique world you make

and remake each day.

Add its shape and your word

to your memory’s bliss.


Then do another.


Don’t you love the way the creative process works with work and words? I especially like Pamela’s last line, “Then do another.” It means that we can do this any time, this expressing our best thoughts through our art and our poetry. It’s so comforting and liberating.
Thanks, Pamela and Caitlyn, grandmother and granddaughter, for sharing your artwork and your poetry.
PS I’m always happy to arrange a small group workshop for you – you don’t even have to be an artist or a poet!


Save

Save

Save

Save

Save

Friday resources, mostly free, all fabulous

But first, before we get to those resources, wanna hear a story? OK, so I needed to find a home for a wonderful easel that Nancy Powlas had given me several years ago. It had belonged to her late sister, and I loved it, but didn’t have room for it in my new studio space. When I got it, it was bent at the back, so I took a rubber mallet and whacked it straight.

Some arty intuition told me to call Lesta Frank to see if she would like it. She came to look at it and said, “Hey, I used to have an easel just like that that I gave away 17 years because it was bent, but I always regretted giving it up.”

And of course, as all good stories go, it turned out to be the very same easel that Lesta had given up and was now returned to her from the Mysterious Art Universe.

lesta

Lesta and easel, reunited at last

So now on to these free resources, most of which are image goldmines for mixed-media artists and designers.

The first one is Pixabay, which has a searchable index of thousands of copyright-free photos and illustrations. I did a search for “rust” and found this beauty – look at the colors and textures! Thanks to Leannah Kurtin Fulmer for reminding me of Pixabay.

rust

The second resource, Unsplash, came to me via Ivy Newport, an imaginative, inspiring and successful artist and teacher – she has curated a collection of portrait photos at Unsplash that are gorgeous. The photos at Unspalsh are offered without restriction – their motto is “Free (do whatever you want) high-resolution photos.” Wow. Here’s one from Ivy’s collection – just think of all the ways you could use this evocative face.

woman

Another photo resource, also free, is Noah Bradley’s Free Photo Reference Megapack. Noah Bradley is an artist and fantasy author who is building an amazing illustrated world called The Sin of Man. He has photos from all over the world to download and use as backgrounds and reference. I downloaded his American Southwest collection and his France and England collection – they are huge albums.

Here are two examples from those collections.

england southwest

The last resource was suggested to me by my friend Linda Krantz. a wonderfully perceptive artist from Houston who was in my class at Vivi Magoo a couple of weeks ago. It’s called MadRat Rubbergreat name. While they don’t have free images, they have the most original and amazing stamps and other cool stuff for mixed-media artists.madrat

Here’s onenot your everyday stamp design, right? And their prices are very competitive, plus you can get them mounted or unmounted.

So now you have lots of places to get inspiration. Print out the photos, tear them up and collage them, stamp into them, veil them with paint and scribble over the paint. That’s going to be the first workshop at the new studio – Intuitive Photocollage!

And if you know a bit of digital imagery manipulation, you can work on you computer to combine these resources into something totally new – like this!

memory

Happy weekend –  if you’re in San Antonio, bundle up – it’s finally gonna feel like Thanksgiving weather. Thanks, as always, for reading SHARDS.

Save

Save

Big Ol’ Sale Saturday and more . . . .

I’m posting my newsletter info to SHARDS subscribers because there’s so much going on in the next couple of weeks at the Studio – take a look and join us if you’re in the San Antonio area.

BIG SALE – I’m very excited about this – Lesta and Alison and I always have a fantastic time, and Michelle Belto will be joining us on Saturday. Her encaustic work has been shown all over the world – you will love it. This BIG SALE will be fun. Date: This Saturday November 28th, time: 10-4, place: my good ol’ Studio. I’ll have tons of new earthenware shards and gifties and Bee Dishes and faces! Please join us for art and Chef Mike’s snacks.

blacksat

Aha! – and speaking of snacks, Lesta and I have decided to have an Art Snacks workshop the afternoon of Saturday, December 5th. So what an Art Snack? It’s a project that you can learn and complete in a short time to give as a gift or to keep. Here are some of the art snacks you will make and take that afternoon:

  • A folding votive candle card
  • A hand-painted collaged luggage tag
  • An origami gift tag ornament
  • A bookmark

It will be a fun way to spend some creative time of your own during a very busy season. You can read more about it and sign up here, tuition is $75, all materials included.

snacksinvit copy

By the way, there are two spaces left in the Wax and Fiber Talisman workshop the next day, Sunday December 6th. This workshop is a bit quieter and more process-focused – check it out.

The next official Show and Tell will be on Saturday, January 30 – yikes, a long time away, but we will have a LOT to talk about. And there may be a little surprise “pop-up” Show and Tell over the holidays – I’ll send out an email in advance.

Please join us at the BIG SALE this Saturday!!

Lyn